Sunday, September 13, 2009
Sunday, June 28, 2009
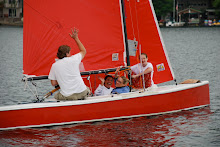
First Day of Racing
Reports are that Scoop, Eagle, Nymph are already for a day of racing. I expect others are or will be, but these in particular I'm aware of... Red Witch is on her way in from Western MA having undergonen some repairs and rebuilding. There is much more to do to get her in top racing shape but time has caught up with the shop team and she needs to get in the water, now!
Anyways, first races are scheduled for 2 PM today.

Anyways, first races are scheduled for 2 PM today.

Thursday, May 28, 2009
RED WITCH REFURB
Photos of new SuperSpars for 110 698

Gibbs fittings and Spinnaker pole ring.

Spreader mounting bracket

Sail key slot

Mast end of boom Gooseneck

Deck band

Forestay fitting with Spinnaker halyard exit box...

Forestay t-ball slot

Masthead construction...
JIM and MARK, here at the top are shots of old 698 mast for reference.

SuperSpar Mast Step for reference

698's old mast end fitting

Halyard lock for rope n wire halyard, also visible is the fitting used for vang.

Main Hakyard exit block

Harken furling assembly with the extension plates...

698's repaired lower mast

698's repaired lower mast

Trapeze, Shrouds and forestay attachment area on 698's old mast.

Scroll down to see some Pictures of International 110 Red Witch 698 Refurb:

Above the failing starboard floorboards come out revealing the framing under the Schock built 110 cockpit.

This shot shows the end of the support frames cut out to provide for bilge water movement.

A shot of the temporarily repaired deck mast support which allowed us to finish the season but needed serious refurbishment for 2009. Also note the port cockpit coaming had failed due to rot and a huge crack along the deckline and was smoothed back with a sander to finish out the 2008 season. Serious rework in these areas needed to be undertaken.

Splashguard removed.

Floorboards and centerline plank removed. Note the bridge still solidly in place.

Forward Keel supporting frames.

Keelbolts through frames that were sistered with ply and glassed. Not sure this is original or modified.
Next some shots of components in their early rough states.

Here is a shot of the modular splashguard base, as close to symetrical as I could accomplish. I started with tracings on rosin paper, moved to a MDF half-template then cut from marine plywood using a wheeled router. Sanded and sealed with a first coat of epoxy.

This shot is of the other components of the splashguard and the shortened tiller. The toughest part of this effort was the design of the jig which I used to cut the compound angles for the front of each angled splashguard side. They have a 15 degree outward lean and approach the centerline at 26.5 degrees making this cut difficult without a sliding coumpound miter saw.
Next are shots of the assembly....


Continuing the examination and repair....

The cracked forward coamings removed.

This shot shows the future floorboards in the boat for initial fittings...

Afer removing the rear keel frame sistering ply which disintegrated when it was being cleaned up for coating...


The above two shots show one shroud plate repair that has failed and one that may be alright for one more season. The following shots show the result of mounting through a balsa cored surface. The cleanup was dirty, painfully slow and far from perfect preparations. Note that in some of these shots you can see the original deck color as built, light blue.


Here a fresh layer of sealing epoxy has been applied to the area between and over the three keel frames.


Dream Towing Machine


Four inch access port to get to furling hardware.

Rain

Rain, go away!

Sealed forward splashboard with angle supports

Multiple coats to seal the aft floorboards and mahogany center plank.

Sealed and primed forward floorboards.
Subscribe to:
Posts (Atom)